StagePlayer 101 Walkthrough
Your Introduction to StagePlayer 2.0
What is StagePlayer?
StagePlayer is Broadway Media's in-house Mac and Windows PC software built for digital scenery. When you purchase a Scenic Projections License, your digital scenery package is delivered within this software.
How does it work?
This walkthrough will cover how to use StagePlayer step by step.
Step 1: Downloading & Opening StagePlayer
Navigate to https://www.broadwaymedia.com/downloads

On this webpage, you have the option to download the latest version of StagePlayer (2.16.0) or the latest Beta version (2.19.0).
The screenshots in this walkthrough use the Beta version.
If you are downloading StagePlayer onto a Windows device:
- Click on either button to download the desired stageplayer.exe into your download folder on your computer.
- Double click to open the application.
This may require the computer's administrator password.
- The application will be downloaded onto your computer.
Minimum Requirements:
- Windows 11 or better
- Intel Pentium 4 processor with SSE2 or equivalent and ≥2.0 GHz
- 4GB of available memory (RAM)
- 10GB available disk space plus an additional 5GB per rental
If you are downloading StagePlayer onto a Mac device:
- Click on either button to download the desired stageplayer.dmg into your download folder on your computer.
- Drag the StagePlayer icon into your Application folder.
- The application will be downloaded onto your computer.
- Double-click on the StagePlayer icon to open the application.
Minimum Requirements:
- Mac OS 10.13 (High Sierra) or better
- 64 bit M1 processor or equivalent and ≥2.0 GHz
- 4GB of available memory (RAM)
- 10GB available disk space plus an additional 5GB per rental
The screenshots in this walkthrough use a Mac computer.
Once installed, the StagePlayer icon looks like this:

Double click the icon to open the software. When StagePlayer first launches, it will look something like this:

StagePlayer has two important windows. The first window is the Controls window. The second window is the Output window. In the above screenshot, the Output window has populated on top of the Controls window. Click and drag the Output window to one side of your screen and click and drag the Controls window to the other. This way, you can see both windows at the same time.

It is helpful to then resize the windows so they are both as large as possible.

Step 2: Logging In & Getting Acquainted
Enter your Email Address and Password, and certify that you have read and agreed to the End User License Agreement and Terms of Service.
Your login details are the same as your Broadway Media online account.
Then, click the yellow [Log In] button.

If you don't yet have a Broadway Media online account, you can create one using the [or create an account] button. Or, if you have been given an Access Key by a collaborator, you can log in with the [Log In using Access Key] button. Most users will be logging in with their Email and Password and will not be using the other login methods.
Once you have logged in, you will be taken to the Show Library:

If you are still within the watermarked rehearsal period, your show package will display when the watermarks will be removed.

If you are already within your license period, your show package will display when your license will expire.

Step 3: Downloading and Opening Your Show
Click the green [Download] button to download your show to your device. This saves the files locally so that you do not need to be connected to the internet when operating your show.

Once your show is downloaded, you can view and operate the Scenic Projections by clicking on the green button. If you are still within the watermarked rehearsal period, you will have a green [Preview] button. If you are within your license period, you will have a green [Present] button:

The [Delete] button deletes your show from where it is stored locally on your device. Your show will continue to be available for download through the end of the rental period. If you need to switch computers, you would delete your show from the first computer and then re-download it on the second in accordance with our one device per user policy.
The [Reset] button restores your show to the default settings, removing any edits you have made.
The [Show Settings] button is where you will get access to the editing features.
More on StagePlayer's editing features in Step 6: StagePlayer's Most Popular Editing Features
Clicking the green [Present] or [Preview] button will open your Scenic Projections package.

In this walkthrough, you will notice that the screenshots are from a show in the watermarked rehearsal period. As you can see, the only difference between the rehearsal materials and the final materials is the presence of the watermark. All of the functionality is the same!
The Controls window has everything you need to control your show. The Output window is where the Scenic Projections will be displayed. Ultimately, the Output window is what will be displayed on your projector. For now, keep both side-by-side on your computer screen.
Step 4: Understanding the Controls Window
At the very top of your screen are four buttons: [Fullscreen] [Curtain Warmer] [Pause] and [End Show].

The [Fullscreen] button should never be clicked when you have your Output and Controls windows on the same screen, as they are in this walkthrough. This is because the [Fullscreen] button will make the Output window take up the whole display. Therefore, this button should be used only when the Output window is safely displayed on your projector and the Controls window remains the only window on your computer.
The [Curtain Warmer] button automatically plays the curtain warmer, regardless of where you are in your show, with a soft 2-second crossfade.

The [Pause] button stops the animation instantly. It is then replaced by a [Resume] button, which resumes the animation immediately.

Finally, the [End Show] button ends the show immediately. Best practice is to wait until the audience has left the theatre before ending your show.
Underneath these buttons, we have the Active and Next Cue Previews:

Cue Previews are still thumbnails, not videos. The moving bar underneath the Active cue shows the cue's progress.

The Active still shows the cue that is currently active. The Next still shows the cue that is coming up next. The Active and Next Cues are color-coded to make it easy to follow your cue sheet.

If you find that the stills are too large for your liking, you can make them smaller with the little arrow in the corner.

If you change your mind, you can press the arrow again to re-expand your view.

This walkthrough keeps the Previews expanded.
Step 5: Operating Your Show
To begin the show, click the [Start] button:

Each cue is made up of two videos: an Action Video and a Loop Video. The Action Video is the first video that plays in a cue sequence and is when something unique happens. For example, in this Action Video, we can see the year "1917" is sliding across the screen:

6 out of 20 seconds of the Action Video have played at the time of this screenshot.
Once the Action Video has finished playing, the Loop Video automatically starts. There is nothing the operator has to do to trigger the Loop Video.

The above screenshot shows the Loop Video. As you can see, the cue remains the same. The Loop Video in this case is 5 seconds long and will keep looping seamlessly until the operator is ready to move to the next cue. Nothing new is happening in the Loop Video — in this case, the snow is gently falling for an atmospheric effect until the script calls for the next cue.
The cue sheet tells the operator exactly when they will need to prompt the software to move to the next cue.

In this case, the next cue appears on Page 3 of the script when the Tsar lifts his daughter and the ballroom fills with guests. The operator has two options for getting to the next cue:

The [Next] button (previously the [Start] button) will have the Loop Video finish completely before moving to the next cue. This means that if you click the [Next] button at 1 second and the Loop Video is five seconds long, the other four seconds will play out before the transition begins.
The [Jump to Next] button will begin the transition to the next cue immediately, with a soft, 2-second crossfade, rather than waiting for the Loop Video to finish. For faster transitions and more accurate timing, it is best to use the [Jump to Next] button.
If you were to click on any cue in the cue sheet (out of order), you would be presented with a pop-up with similar options.

[Cue Next] will put this cue in the next cue position. [Jump To] will immediately play this cue in a soft 2-second crossfade. If you have accidentally clicked on this cue and did not intend to go there, you can simply click the [Close] button in the upper right-hand corner of the pop-up.
Finally, we have the [Blackout Now] button.

This button automatically plays a black out, regardless of where you are in your show, with a soft 2-second crossfade. It is recommended to only use this button in emergencies. You can add in intentional blackouts using StagePlayer's editing features.
Step 6: StagePlayer's Most Popular Editing Features
To navigate to StagePlayer's editing tools, you will need to end your show using the [End Show] button. Clicking that button will open the following pop-up, where you will once again click [End Show].

Ending your show will take you back to your Show Library. Once there, click [Show Settings]:

This page has some plug-and-play editing features.

For now, un-click all of the Blackout Options. You will find out how to add in Blackouts exactly where you want them later in this walkthrough (instead of the three more general options here).

For a breakdown of the rest of the features on the above page, see our StagePlayer Advanced Features Walkthrough.
The most popular editing features can be found by clicking the [Edit Cues] button.

Which will bring you to this page:

At the very top of your screen are five buttons: [Cancel] [Save] [Save & Exit] [Export Cue Sheet] and [Sync with Web].

The [Cancel] button will discard all your changes and return you to the Show Library.
The [Save] button will save all your changes to your device's hard drive and keep you on the [Edit Cues] page.
The [Save & Exit] button will save all your changes to your device's hard drive and return you to the Show Library.
Before or after edits are made, you can download the Cue Sheet as a .csv file using the [Export Cue Sheet] button.
The [Sync with Web] button is intended to sync your changes with the web so that you or a collaborator can access the changes on another device.
The [Sync with Web] feature is still in development and is not currently 100% operational. Therefore, best practice is to make all of your edits on the device you intend to use for your production so that you are not reliant on this beta feature.
Next we have the side bar, which operates in the same way as the Cue Previews do in Present/Preview mode to tell you what cue is Active and what cue is up Next.

You can make edits at the Act, Scene, and Cue levels.

To make edits to the Act, hover your cursor over the Act. This will cause two lines to appear on the left and three dots appear on the right.

The two lines let you click and drag to put the item in a new position. For example, Act I can be dragged into the Act II position instead.
Clicking on the three dots will open a drop down menu.

The [Disable] button will disable the entire act. When this happens, the three dots are replaced with a disabled symbol. To re-enable the act, simply click on the symbol and select [Enable].

The [Duplicate] button will duplicate the entire act.
The [Filters] button will open a filters menu, where you can adjust the grayscale, brightness, contrast, opacity, saturation, and hue. These filters will be applied to the entire act.

The functionality for Scenes is the same. When you hover your cursor over the Scene, two lines will appear on the left and three dots will appear on the right:

In this case, the two lines will let you click and drag the Scene into a new Scene position. For example, Scene 1 could be dragged into the Scene 2 position.

As before, clicking on the three dots will open a menu.

Our choices once again include the [Disable], [Duplicate], and [Filters] buttons which work the same way as they do on the Act level, only this time applied to the Scene instead.
A new option is [New Cue] which opens another menu when pressed.

This allows you to add three different types of new cues to your scene. Each new cue that you add will populate at the very bottom of the Scene at first. You can move these around at the Cue level.

The Blackout cue brings you into a blackout.

The Curtain Warmer cue brings up the show's Curtain Warmer.

The Camera cue brings up a live camera feed. StagePlayer automatically chooses the camera that your computer has set as the default.

If you want to change the camera that StagePlayer is using (from your laptop's built in webcam to a GoPro, for example), you will need to make those changes in your computer's camera settings and not in the StagePlayer application.
At the Cue level, as before, when you hover your cursor over the cue that you would like to edit, the two lines will appear on the left and the three dots will appear on the right. In the below example, Cue 24 is being hovered over.

If you hover your cursor directly over the tiny still, a slightly larger version of the cue will pop up and the animation will begin to play.

The lines let you click and drag the cue within the Scene. If you try to drag the cue outside of the Scene, the software will not let you. To move the cue outside of the Scene, you will need to utilize the menu from the three dots.

Reviewing this menu from the beginning, the [Cue Next / Jump To] option opens up the pop-up you will recognize from Present/Preview mode.

This allows you to play a cue and see the edits you have made to said cue on the Output window without having to switch back to Present/Preview mode.

The [Disable], [Duplicate], and [Filters] options all operate the same way as they do on the Act and Scene levels, only this time applied to the Cue instead.
The [Move] button is what allows you to move your Cue outside of the Scene it is in.

For example, if you wanted to move this Cue to appear after the "Government Office" Cue in Scene 3, you would choose the following from the drop downs:

Then, you would click the [Move] button.

You will notice that the Cue has been automatically re-numbered to reflect its new position in the list. It is no longer Cue 24, but Cue 31.
Sometimes when you move a Cue, you will notice an emergency icon pop up on the left.

When a cue is moved out of order, the Action Video will often no longer make sequential sense. Therefore, StagePlayer automatically knows to disable the Action Video. The emergency icon informs you when this has occurred.
If you would like to re-enable the Action Video, you can do so by clicking the orange [Bypass Restriction] button. Always remember to save your edits before you click this button. Clicking the button will immediately take you out of the [Edit Cues] page and back to the [Show Settings] page, where you can choose to bypass the restriction by checking the box:

Returning to the Cue menu, the [Edit Description], [Edit Page Number], and [Edit Line] options allow you to change the text from what was provided to whatever works best for your specific production.
For example, if you wanted Cue 31 to happen in conjunction with a light cue, you could easily edit the cue sheet to reflect the light cue as the Cue Line instead of the provided line from the script. You would click [Edit Line] and type the new cue ("Light Cue 13", for example) into the box.

To implement the changes, you would click [Edit] and the new Cue Line would be saved.

The [Edit Description] and [Edit Page Number] options work the same way. Anything you type into the [Edit Description] box will appear in the Description spot on this cue in the cue sheet. Anything you type into the [Edit Page Number] box will appear in the Page Number spot in the cue sheet.
Next on the menu is the [Transitions] option.
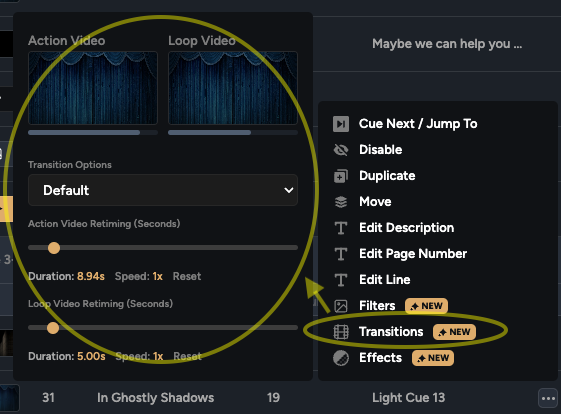
At the top is a small visual of the Action and Loop videos. Unlike our Cue Previews, in this menu, you will actually see the video play out. The bar underneath each video demonstrates how quickly or slowly each video is moving.
Your first editing option is found by clicking the drop down under Transition Options.

This lets you choose between the Default transition option, which is a soft 2-second crossfade at the beginning of the cue, or a true Hard Cut at the beginning of the cue.
Your next editing option is editing the speed of the Action and Loop videos.

Click and drag the small yellow ball to the left to make the video slower and to the right to make the video faster. The Duration and Speed quantities will automatically adjust as you drag the ball:

The last option at the Cue level is [Effects]. This is how you add in Masks you have created.
As the Mask Creator is a feature that is still in development and is not currently 100% operational, this also renders the [Effects] option unusable at the moment.
Need Help?
Thank you for taking the time to familiarize yourself with our software. To learn even more, please see our StagePlayer Advanced Features Walkthrough.
If you have any further questions, you can reach our team at help@broadwaymedia.com.