StagePlayer Advanced Features Walkthrough
What is StagePlayer?
StagePlayer is Broadway Media's in-house Mac and Windows PC software built for digital scenery. When you purchase a Scenic Projections License, your digital scenery package is delivered within this software.
How does it work?
If you haven't yet, please start by reading our StagePlayer 101 Walkthrough. That walkthrough covers everything from downloading the software to StagePlayer's most popular editing features.
What does this walkthrough cover?
This walkthrough explains everything the StagePlayer 101 Walkthrough doesn't, including:
- StagePlayer's Sidebar features
- Library
- Tools
- Application Settings
- Profile
- Computer Performance
- Support
- Logging Out
- Show Settings not discussed in the StagePlayer 101 Walkthrough
- Animation Options
- Curtain Warmer Settings
- Configure Displays
Section 1: StagePlayer's Sidebar

StagePlayer's sidebar can be expanded or collapsed depending on your preferred view. To collapse the sidebar, click on the three lines that appear in the upper right (across from the logo).

To re-expand, simply click the three (now vertical) lines.

This walkthrough keeps the sidebar expanded.
The [Library] page is the default page StagePlayer opens to. At the top right of the page is a refresh button.

It can be useful to refresh this page after deleting a show from your library. Although the refresh button does not depress or highlight when it is clicked, it does work.
The next tab is the [Tools] tab.

The [Tools] tab opens up to the [Test Patterns] page. Here, you can choose from the various test patterns to help set up your Output on your projector. The [None] and [Grid] patterns both display the Broadway Media grid and logo on the Output window.


The [Colors] test pattern looks like this:

The [Grayscale] test pattern looks like this:

The test pattern you select will only stay on your Output window as long as you are on the [Test Patterns] page. Otherwise, the selection will default to the Broadway Media grid and logo.
The next option is the [Curtain Warmer] page. This page allows you to upload a different Curtain Warmer than the App Master (which is the gold sparkles).

Click on the [Upload] button to choose a Curtain Warmer from your computer. Your chosen file must be a still image (such as a .png or .jpeg). Video formats are not supported for custom Curtain Warmers at this time. Click [Open] after selecting your chosen file:

Your selection will appear instead of the App Master:

To revert your App Master back to the default, click the [Revert] button.
The [Test] button is still in development and is not currently 100% operational. Though you cannot accurately test your Curtain Warmer on this page, please rest assured that your choice has been saved.
To assign the new App Master as the Curtain Warmer for your specific show, see Section 2 of this walkthrough.
The next option is the [Vignettes] page. This page allows you to add vignettes to the Output.

StagePlayer offers some preset vignettes to choose from. To see the selection, click on [Preset Vignettes].

To select a vignette, click on the [Select] button. It will light up yellow when selected.

The vignette you choose will be applied to every cue in your show.


You also have the option to upload your own vignette if you would like:

Simply click the [Upload] button and choose your vignette from where it is saved on your computer. If you decide you no longer want the vignette you have assigned, simply click the [Revert] button.
The next option is the [Masks] page.

Masks are used to obscure (or "mask off") part of the projection from appearing elsewhere. For example, you may use a mask to prevent your projection from spilling onto a physical set piece that is quite close to your projection surface, which would break the backdrop illusion.
The Mask Creator is another feature that is still in development and is not currently 100% operational. More on masks in the next version of StagePlayer!
The next option is the [Watermark] page.

This page allows you to upload a watermark to appear on the content. As with the vignettes, the watermark will be applied to every cue in your show.
Simply click the [Upload] button and choose your watermark from where it is saved on your computer. If you decide you no longer want the watermark you have assigned, simply click the [Revert] button.
Finally, use the slider to choose the Watermark Opacity. The closer the slider is to the left, the lighter the watermark will be. The closer the slider is to the right, the more opaque the watermark will be:


The final [Tools] option is the [Shortcuts] page.

On this page, you can assign your own shortcuts to operate the digital scenery. For example, instead of pressing the [Next] button to move to the next cue, you can simply click [Shift] [N] on your keyboard.
You can also change the shortcuts from the preset options to whatever works for your show. For example, to make the [Next] cue easier, assign it the [N] cue (without the [Shift] requirement). To do this, first click on the [Change] button:

The button will now say [Enter Shortcut].

Click on the key on your keyboard that you would like the shortcut to be. Shortcuts must be letter keys. They can include the [Shift] or [Option] keys as well. Number keys or the space bar will not work. For this example, click the [N] key.

Once you click the chosen key, it will automatically update. The [Enter Shortcut] button will return to the [Change] button.
The next tab is the [Application Settings] tab.

The [Application Settings] tab opens up to the [General] settings page. The first section, labeled Account, shows you what email address you are logged in with. It is where you can reset your password.

When you click the [Reset Password] button, a pop-up showing that a password reset email has been requested will show up.

Click [OK]. Then, check your email and follow the instructions for resetting your password.
The next section, labeled Version, shows you what version of StagePlayer you are on. Here, you can check to see if you are on the latest version of StagePlayer.

When you click on the [Check for Update] button, it will not highlight or depress. If nothing happens, it simply means you are on the latest version.
The next section, labeled Downgrade Version, allows you to downgrade to an older version of StagePlayer.

This action should only be taken if recommended by our support team. Clicking on the [Downgrade to v1.8.1] button will automatically begin the download of this version to your device.
The next section, labeled Support, allows you to submit a support ticket for our team:

Clicking on the [Submit Ticket] button will automatically open the Digital Scenery Help Ticket form in your browser. The form will look like this:

You can fill out this form with the necessary details and then click the [Submit to Customer Success Team] button at the bottom to submit the form.
The final section in the [General] settings is Change Language.

Clicking on the drop-down will allow you to change the software's language. The current available languages are English and German:

The next Application Settings option is the [Outputs] page.

This page shows you your active Outputs and allows you to add additional Outputs and Virtual Outputs.
Output 1 is always active and cannot be disabled.

Clicking the [Center Window] button will center your Output window in the middle of your screen.
To create an additional Output, simply click the [Prepare] button on your desired Output. You can prepare up to five Outputs.


You can designate which cues show up on which Outputs. You could have the same cue show up on both Outputs:

Or, you could have different cues show up on different Outputs. In the below example, the cue has been designated to show up on Output 1 but not Output 2:

Instructions for how to designate cues to the desired Outputs can be found in Section 2: Show Settings
If you want the cue to show up across both Outputs, like if you are using two projectors together to create one large image, that is when you need a Virtual Output.

The Virtual Output feature is still in development and is not currently 100% operational. If you need to blend two projectors together for your production, I recommend downloading StagePlayer now and using StagePlayer's free Demo Show to test out the feature. This way you can see if the Virtual Output feature's current capabilities meet your needs before making your purchase.
To create your Virtual Output, click on the [Create Virtual Output] button:

The button may look like it is not clickable, but it is. Once you click on it, your new Virtual Output will appear:

You can always close your Virtual Output by clicking the [Close] button.
Assign the Outputs that you would like to work together to create one image by assigning them the same Virtual Output from the drop-down menu:

Further instructions for how to designate cues to the desired Virtual Outputs can be found in Section 2: Show Settings
The next Application Settings option is the [Display] page.

With the Display Mode choices, you can choose how the content fills the Output window.

This can be useful if your screen size is different than the size the content is designed in.
All of our content is designed in a 16:9 aspect ratio.


As you can see, if the aspect ratio of your screen differs greatly from 16x9, your image will look quite distorted or be significantly cut off if you change the Display Mode.
You can use the Zoom Options to further adjust how the image is displayed.

The [Center], [Top], [Left], [Right], and [Bottom] options let you choose where the pinpoint of the Zoom will be:


To zoom out, move the sliding ball to the left.

To zoom in, move the sliding ball to the right:

As with the Display Mode, these changes can make your projections look quite distorted. Transitions are often greatly affected by any changes made to the [Display].
The next Application Settings option is the [Sound] page.

The vast majority of our Scenic Projections packages do not contain sound. However, a select few titles do (like Young Frankenstein, for example).
Simply click the box to turn the sound on.

The final [Application Settings] option is the [Advanced] page.

The first section, labeled Enable Lite Mode, lets you click the box to enable Lite Mode:

If your transitions are lagging or buffering, you may want to try running your show with Lite Mode enabled. Ultimately, you may need to use a different device, but enabling Lite Mode first may solve your issue.
The next section, labeled Enable Legacy Rendering, lets you click the box to enable Legacy Rendering:

Similar to Lite Mode, this can be used if you are experiencing issues with StagePlayer, especially if you are using older or outdated hardware. As with Lite Mode, this is not a guaranteed fix, but it is a worthwhile troubleshooting step.
The next section, labeled Enable Debug Mode, lets you click the box to enable Debug Mode:

Debug Mode is only necessary if our support team has requested it to resolve an issue you are facing. Debug Mode will open the Developer's Console:

It will also include additional information on your Output:

The next sections, labeled QLab Incoming Port and QLab Outgoing Port are only applicable to you if you have a Professional License:

More information for Professional License users can be found in this article.
The final section in the [Advanced] settings is Clear Cache.

To clear the cache, click on the [Clear Cache] button. The button may look like it is not clickable, but it is. Although the button does not depress or highlight when it is clicked, it does work.
After clearing your cache, you will be required to [Delete] your shows from your Show Library and re-download them. This means that clearing your cache will also clear any edits you have made thus far.
Best practice is to only clear your cache if you have been instructed to by a member of our support team, or after your final performance.
The next tab is the [Profile] tab:

The [Profile] tab only has only one page. As with the first section of the [Application Settings] tab, here you can see what email address you are logged in with and reset your password. The functionality is the same as before.
The next section, labeled Logout, allows you to log out of the application by clicking the [Logout] button:

Clicking this button will present you with a pop-up to ensure you want to log out:

If you changed your mind, you can click [Cancel] and you will not be logged out. Or, to proceed, click [Logout] which will take you back to the login screen.
The next tab is the [Computer Performance] tab:

This page is designed to inform you how well your computer is equipped to the run the Scenic Projections.
This page is still in development and is not currently 100% operational. Unless a member of our support team asks for a screenshot of this page, you can ignore it for now. At the moment, a better measure of whether your device is capable of running the Scenic Projections is to check its specifications against StagePlayer's minimum system requirements.
The final tab is not a tab at all, but simply a [Support] button.

Clicking this button will open our Help Ticket Form.

You can fill out this form with the necessary details and then click the [Submit] button at the bottom to submit the form.
Finally, at the very bottom of the Side Bar is a logout button:

As with the logout function mentioned previously, clicking this button will prompt you with a pop-up to ensure you would like to log out.
Section 2: Show Settings
Our StagePlayer 101 Walkthrough covers many of the available editing options StagePlayer provides. This section addresses the rest.
As a reminder, to get to your [Show Settings], simply click the [Show Settings] button for the show you wish to edit.
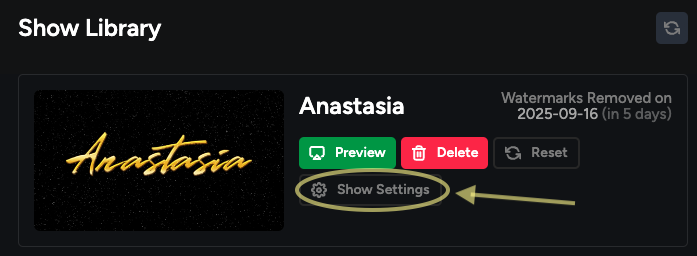
Clicking the [Show Settings] button will open you up to this page:
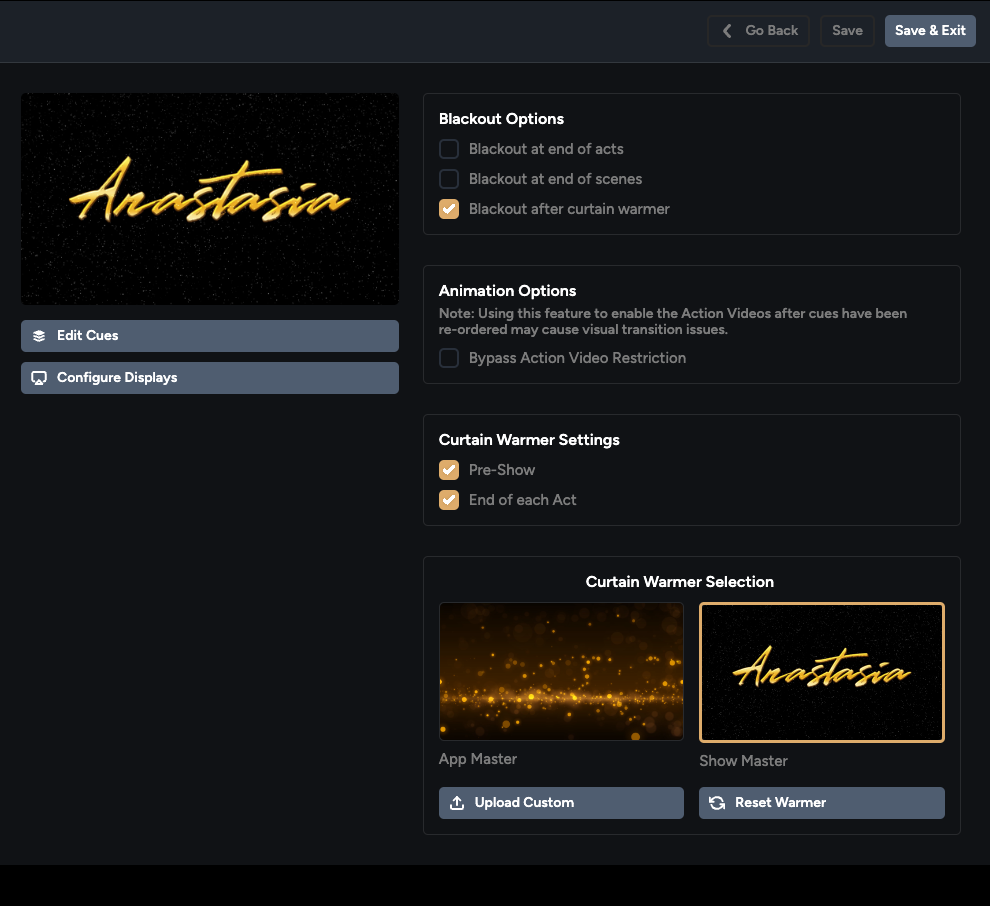
At the top of this page, you have the following options:

Clicking the [Go Back] button will return you to your [Show Library]. Once you make any edits on this page, the [Go Back] button will be replaced with a [Cancel] button.

When you click the [Cancel] button, a pop-up will occur to confirm that you would like to return to the [Show Library] without saving your changes.

To continue and discard your changes, click [OK]. To remain on the page, choose [Cancel].
The [Save] button saves your edits and keeps you on the current page. The [Save & Exit] button saves your edits and returns you to the [Show Library].
For information on the Blackout Options and Animation Options, see Step 6 of our StagePlayer 101 Walkthrough.
The Curtain Warmer Settings section allows you to choose when you would like your Curtain Warmer to display.

You can click and un-click the check boxes to tell the software whether it should or should not show your curtain warmer before your show begins (Pre-Show) and at the end of each act.
The Curtain Warmer Selection section allows you to designate what your Show Master Curtain Warmer looks like.

Your selected Curtain Warmer will have a yellow border around it. In the above screenshot, you can see that the Show Master is the selected Curtain Warmer.
The Show Master is the Curtain Warmer that is specific to the show you have rented. The App Master is the generic Curtain Warmer that we provide.
Earlier in this walkthrough we covered how to change the App Master to a custom Curtain Warmer. On this page, you will be able to see that selection.

If your custom Curtain Warmer is the one you would like to use for your show, ensure that it is selected with the yellow border.
On this page, you can upload a custom Curtain Warmer that will replace the Show Master instead of the App Master by clicking the [Upload Custom] button.

As before, your custom Curtain Warmer must be a still image (such as a .png or .jpeg file). Video formats are not supported at this time.
Once you have chosen your file, click the [Open] button.
You will see that the Show Master Curtain Warmer has been replaced:

Click the [Reset Warmer] button if you would like to reset the Show Master to the original.
The final option left to cover on this page is the [Configure Displays] button.

This is where you designate each cue to your desired Output.

The buttons at the top have the same functionality as mentioned previously in this walkthrough:

To assign a cue an Output, simply click the drop down menu for the cue you wish to edit.

This will open the drop-down options.

As a reminder, if you have one or more Outputs that you are using to create one large image, you will want to select the Virtual Output you have created.
Returning to the examples given previously in this walkthrough, here are their accompanying Output Settings:


Need Help?
Thank you for taking the time to further familiarize yourself with our software. If you have any additional questions, you can reach our team at help@broadwaymedia.com.